(ThyBlackMan.com) What’s old is new again. If you have old CDs, audio cassettes, or even LPs, you might be surprised to learn that everything can be saved and digitized. It’s a lot cheaper than buying all of your favorites all over again. And, it’s rather simple to pull off. Here’s how.
Converting LPs
This is probably the hardest of all media to convert, because it requires special hardware to make it work properly. You’ll need a good USB turntable capable of amplifying the sound from your records. It should also perform the A2D (analog to digital) conversion at the source. That way, you won’t need an outboard phono stage and analog-to-digital converter. You’ll also want a high-quality sound card like the Lynx L22.
If you don’t have an audio card, you have a few choices out on the market right now. The Rega Fono Mini A2D is $175. The Pro-Ject PhonoBox USB is $200, and the Bellari VP-530 USB is $400. Of these, the Bellari is the best (you get what you pay for).
It has a higher quality Burr-Brown A2D converter, and uses a single 12AX7 tube with a headphone amp.
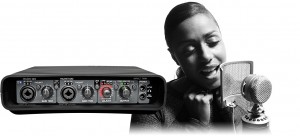
You can also use something like the Twin Impact FireWire Audio Interface (also $400) from TC Electronic. With this product, you remove the photo stage from the process and send a digital signal to your computer directly from the turntable.
You will need to add a few converters with RCA plugs on one end from the table and end as Neutrik XLR connections for the front panel of the interface. You can get these converters from Channel D (they also make the Pure Vinyl – the software that runs on your Mac and reproduces the sound of vinyl).
If your’e an audiophile, and you want everything preserved in 16-bit/44.1kHz, or even the 24-bit/192kHz FLAC high resolution, then you’re going to want a program like Pure Vinyl, not iTune’s lame MP3 format.
Keep in mind, it’s not a cheap program. iTunes is free, which is where you may end up. Pure Vinyl is $280, but it accurately reproduces the sound of your old LPs with stunning accuracy. The program uses the standard RIAA curve as the default setting and it also comes with 60 additional equalization curves for mono recordings, 45s, and 78s.
Actually recording an album is easy. The program can sense when the needle drops into the groove and will start recording. When it’s time to flip the record over, it will pause and wait for you, then start recording when the needle slides down into the groove. There’s just one downside to Pure Vinyl: it’s only for the Mac, and it doesn’t look like the company will be making a PC version.
How much time do you want to invest in converting your old LPs? That depends on you, really. This is one of those things that you have to babysit. You can’t just “set and forget.” So, if you’ve got thousands of old records you want to digitize, start with the ones that are irreplaceable. Then, consider whether you really want to go through with the others. If you can buy them on CD, that might be a better use of your time.
Of course, if you have enough money to hire an assistant, or you can snag an audiophile from a local college for some intern-like work, everything might work out just fine with the digital conversion.
Converting Cassettes
Cassettes are, thankfully, much easier to convert than LPs. For this process, you’ll need a cassette player and an RCA-to-line-in converter plug (if your cassette player uses uneven line outputs), a laptop, and a 3.5mm headphone jack to 3.5mm headphone jack if your cassette player just has a headphone jack.
If your tape deck has uneven line outputs, plug the RCA cables into the deck and connect the 3.5 mm jack into the line input on your computer. Do not connect it to the microphone input. The line input will have what looks like little “waves” spreading outwards above it. It’s usually right next to the headphone input and it a green input.
If you’re using Audacity, or some other free recording software, make sure it’s set to “line input” by clicking on the menu next to the microphone icon.
Check the signal from the cassette player. Too much, and you’ll have distortion. Too little, and there will be a lot of hissing and muffled sounds. Set the input and adjust the levels on your PC. Now, open the sound control panel. Click the recording tab and then click “line in.” Click “set default.”
Click “properties” and click on the “levels” tab. Now, move the volume slider all the way to the right to increase the recording volume. Now, click “OK.” When you’re done, return to the sound dialog box and click “OK.”
Press “play” on your cassette player to check the sound levels. They should be at about 80 percent. Once it’s done recording, you have your digital copy and you can save it in any file format you want.
Converting CDs
If you’re converting CDs, you will need your computer’s default media player, a program like YTD, found on this site, and a little time.
The CD or optical drive on your laptop or desktop will play the CD for you, and your media player will “rip” the music from the CD onto the computer. Usually, this is as easy as inserting the disc in the drive and pressing “rip.” Once it’s finished, save the file.
Now, usually, you’re stuck with an MP3, but you can convert the file to any file type using YouTube Downloader. Once you’re converted the file to a file type that you want, you can pack up the CD and let it collect dust in the attic.
Always remember to respect IP when using downloaded content. If you are wondering whether it is legal for your to record streaming video for your own personal uses consult a lawyer and read what YTD has to say about that here.
Staff Writer; Dawn Moore


Leave a Reply